
What Is a Measure Point?
A Measure Point represents a machine, production line, or other part of your production process that you want to monitor in Good Solutions.
Measure Points are the foundation for collecting and analyzing production data. They allow Good Solutions to associate production information with the correct equipment, including:
- OEE, Availability, Performance, and Quality
- Produced, approved, scrapped, and reworked quantities
- Production stops and Stop Reasons
- Articles and Orders
- Shift Schedules and production time
Before collecting production data from a new machine, you need to create and configure its Measure Point.
Before You Begin
Make sure that:
- You have access to GS Desktop and the necessary configuration permissions.
- You know which machine or production line the Measure Point represents.
- The appropriate Shift Schedule has been configured.
- The relevant Stop, Scrap, and Rework Reason folders are available.
- You have identified any Articles that should be associated with the Measure Point.
Important: The configuration wizard was originally developed for RS Production. It is still used in GS Desktop, but some settings—particularly those relating to Operator Tools—reflect the older desktop environment. The wizard will eventually be replaced.
Operator Tools is now part of Good Solutions Web, and not all legacy configuration options apply to the web experience.
Step 1: Open the Measure Point Wizard
- Open GS Desktop.
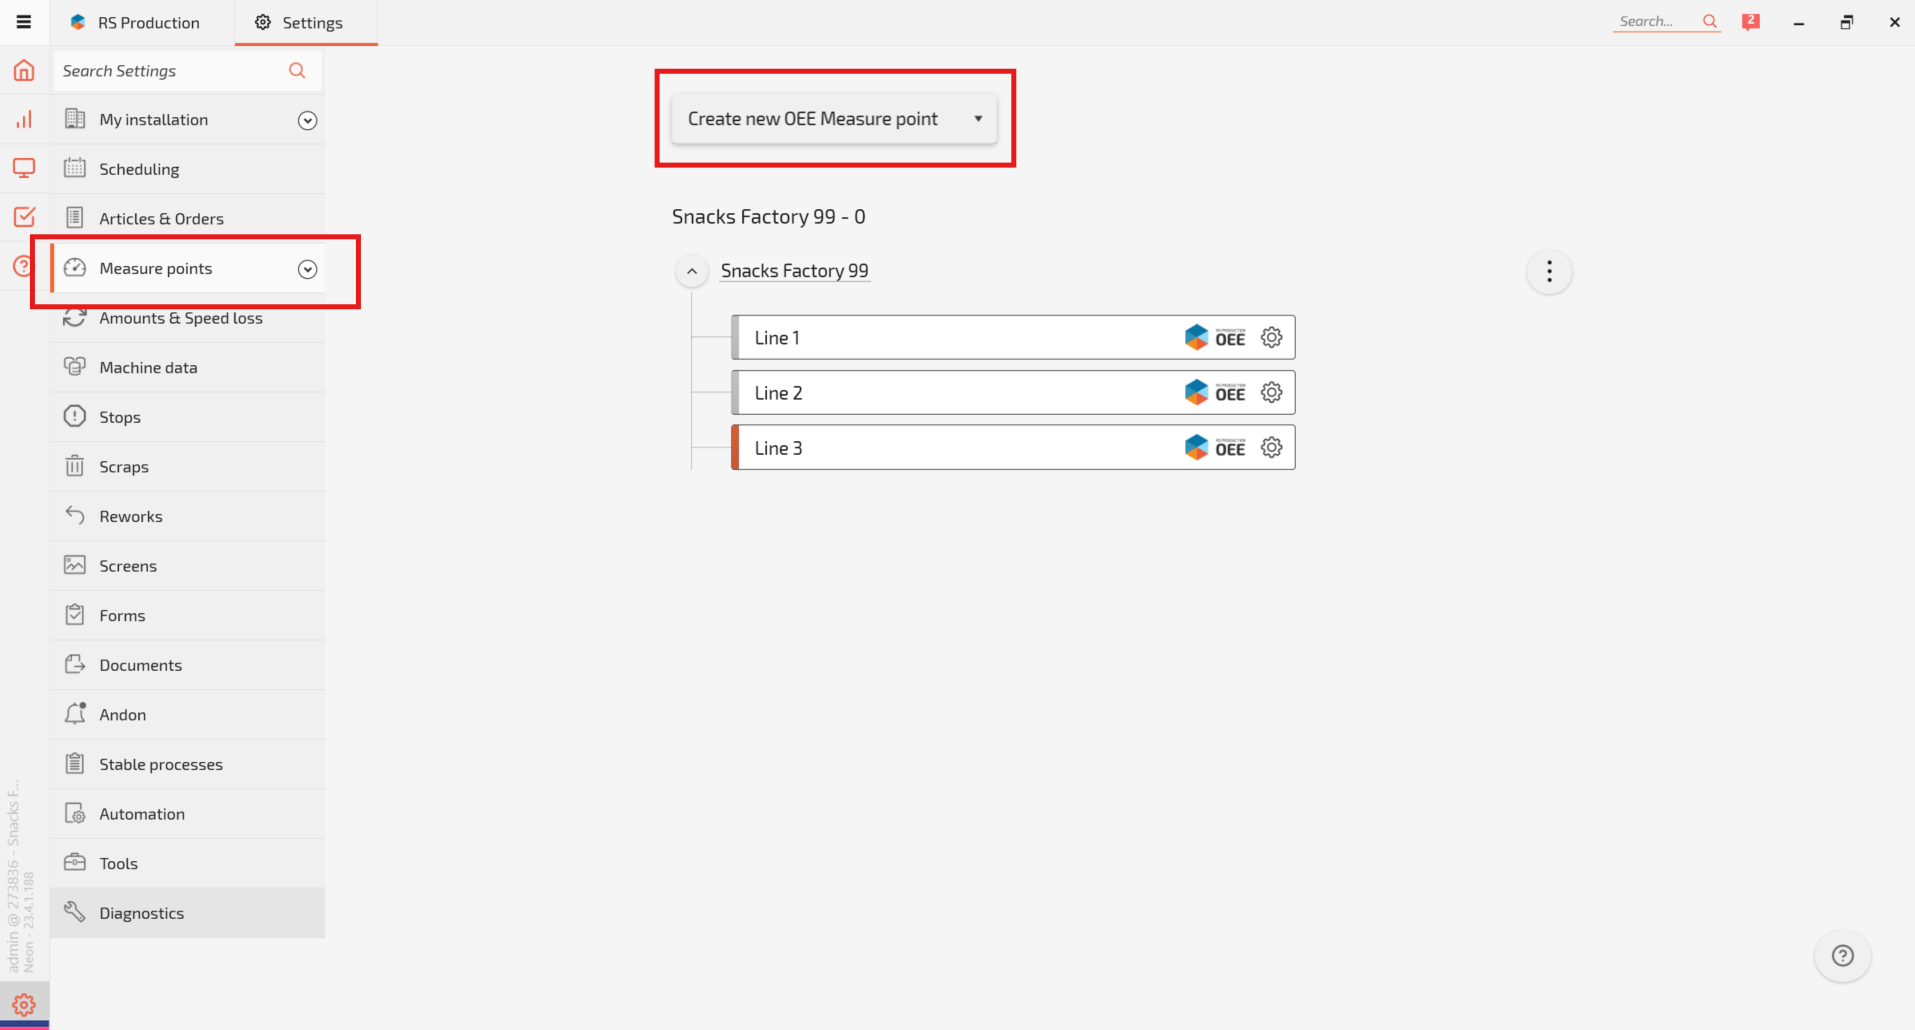
- Navigate to Settings → Measure Points.
- Click Create New OEE Measure Point.
The configuration wizard opens and guides you through six steps.
Step 2: Configure Settings
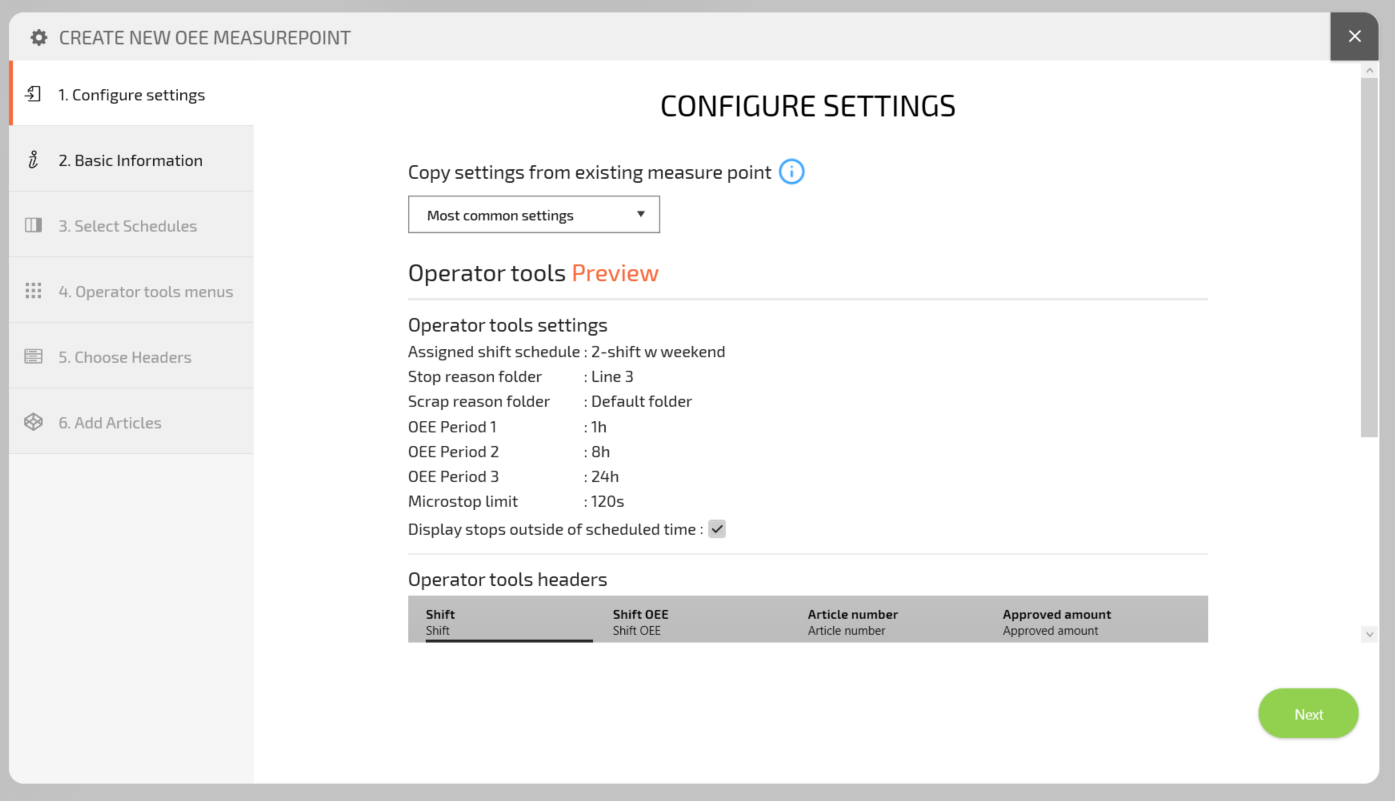
The first step allows you to start with an existing configuration rather than configuring everything from scratch.
Under Copy settings from existing Measure Point, select an existing Measure Point or choose Most common settings.
The wizard displays a preview of the selected configuration, including settings such as:
- Assigned Shift Schedule
- Stop Reason folder
- Scrap Reason folder
- OEE periods
- Microstop limit
- Whether stops outside scheduled time are displayed
- Operator Tools headers
Using an existing configuration can save time when creating multiple similar Measure Points.
Tip: If you are adding another machine to an existing production line, copying settings from a similar Measure Point is often a useful starting point. Review the copied settings carefully before proceeding.
Click Next.
Step 3: Enter Basic Information
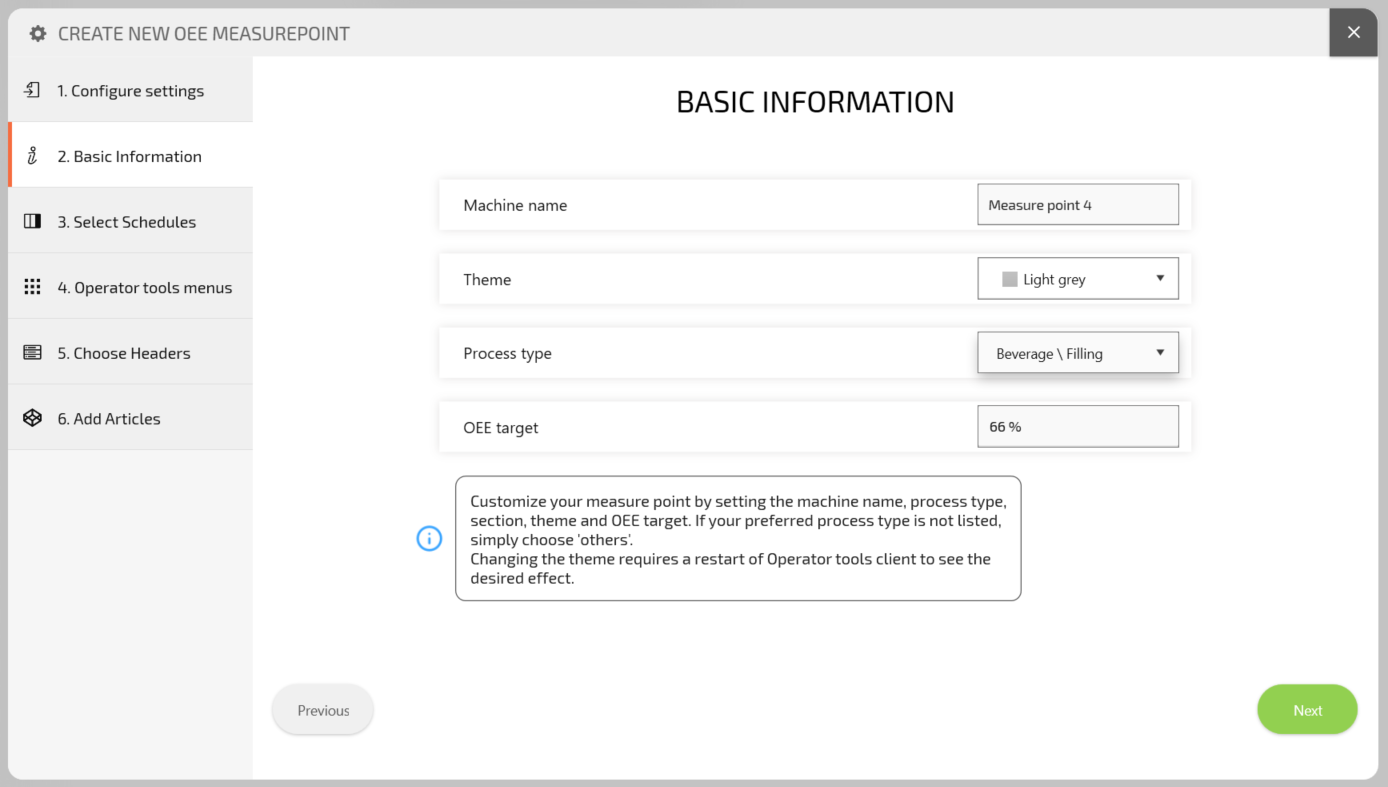
In Basic Information, configure the identity and basic characteristics of the Measure Point.
| Setting | Description |
|---|---|
| Machine name | The name used to identify the machine or production line in Good Solutions |
| Theme | The visual color theme associated with the Measure Point |
| Process type | The type of production process being monitored |
| OEE target | The target OEE percentage for the Measure Point |
Machine Name
Choose a clear, recognizable name, such as Packaging Line 1, CNC Machine 3, or Assembly Station A.
Using consistent naming conventions makes it easier for operators and managers to identify equipment in dashboards and reports.
Theme
Select a color theme to help visually distinguish the Measure Point.
Process Type
Choose the process type that best describes the equipment.
If your preferred process type is unavailable, the wizard's guidance indicates that you can select Others.
OEE Target
Enter the target OEE percentage for the machine.
For example, setting an OEE target of 75% allows users to compare actual OEE performance against that target.
Note: The legacy wizard indicates that changes to the theme require a restart of the Operator Tools client. Because Operator Tools now runs in Good Solutions Web, this instruction may not apply in the same way.
Click Next.
Step 4: Select Schedules and Reason Folders
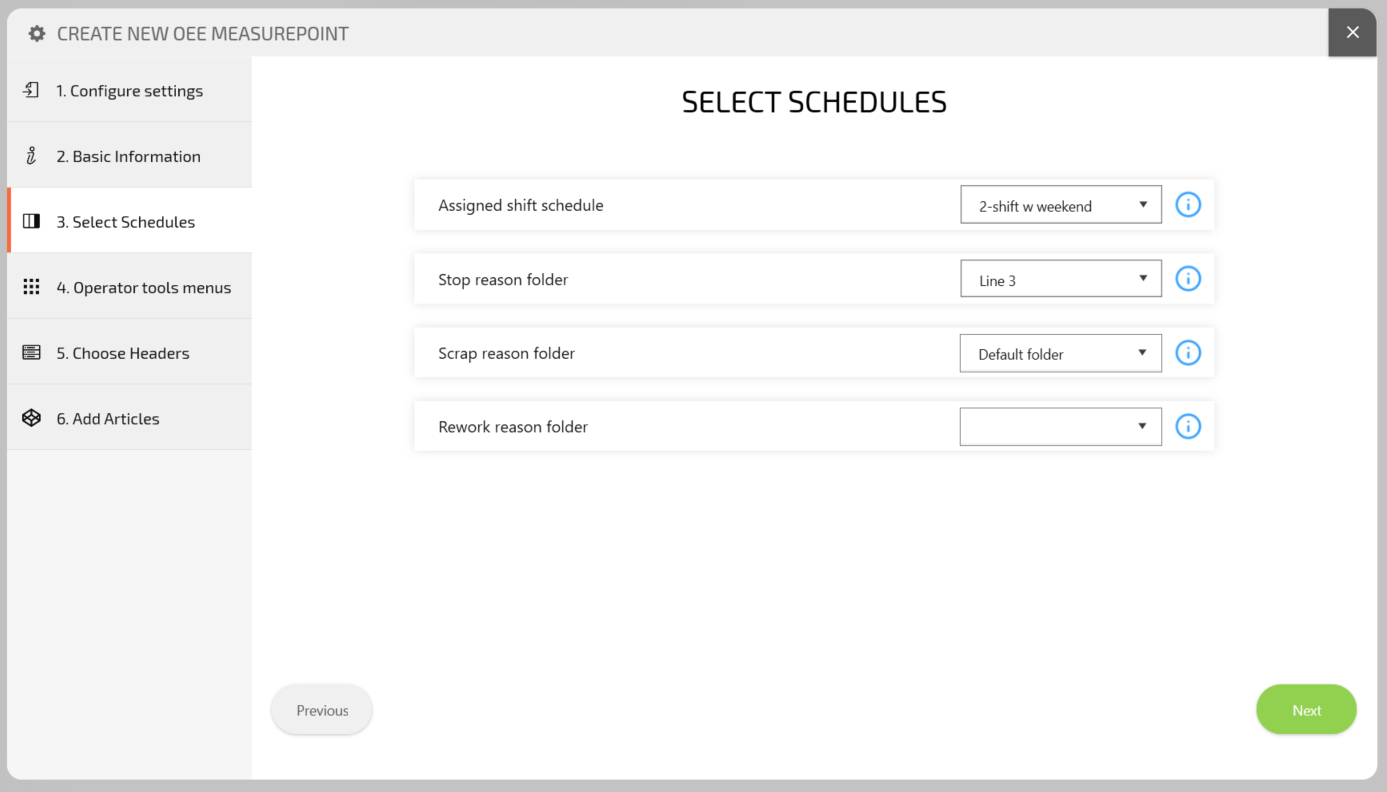
The Select Schedules step determines which production schedule and reason code structures are associated with the Measure Point.
Configure the following:
| Setting | Purpose |
|---|---|
| Assigned Shift Schedule | Defines the scheduled production time for the Measure Point |
| Stop Reason folder | Determines which Stop Reasons are available |
| Scrap Reason folder | Determines which Scrap Reasons are available |
| Rework Reason folder | Determines which Rework Reasons are available |
Assigned Shift Schedule
Select the Shift Schedule that applies to the machine.
The schedule defines when production is expected to take place and is essential for calculating Availability and OEE correctly.
For example, a machine operating on two shifts during weekdays and additional weekend shifts should use the appropriate schedule configuration.
Stop Reason Folder
Select the folder containing the Stop Reasons operators should use when categorizing production stops.
Scrap and Rework Reason Folders
Select the folders containing the appropriate quality-related reason codes.
These determine which reasons are available when registering scrap or rework.
Tip: Verify that the correct reason folders are assigned. Incorrect assignments can make it difficult for operators to categorize losses accurately.
Click Next.
Step 5: Configure Operator Tools Menus
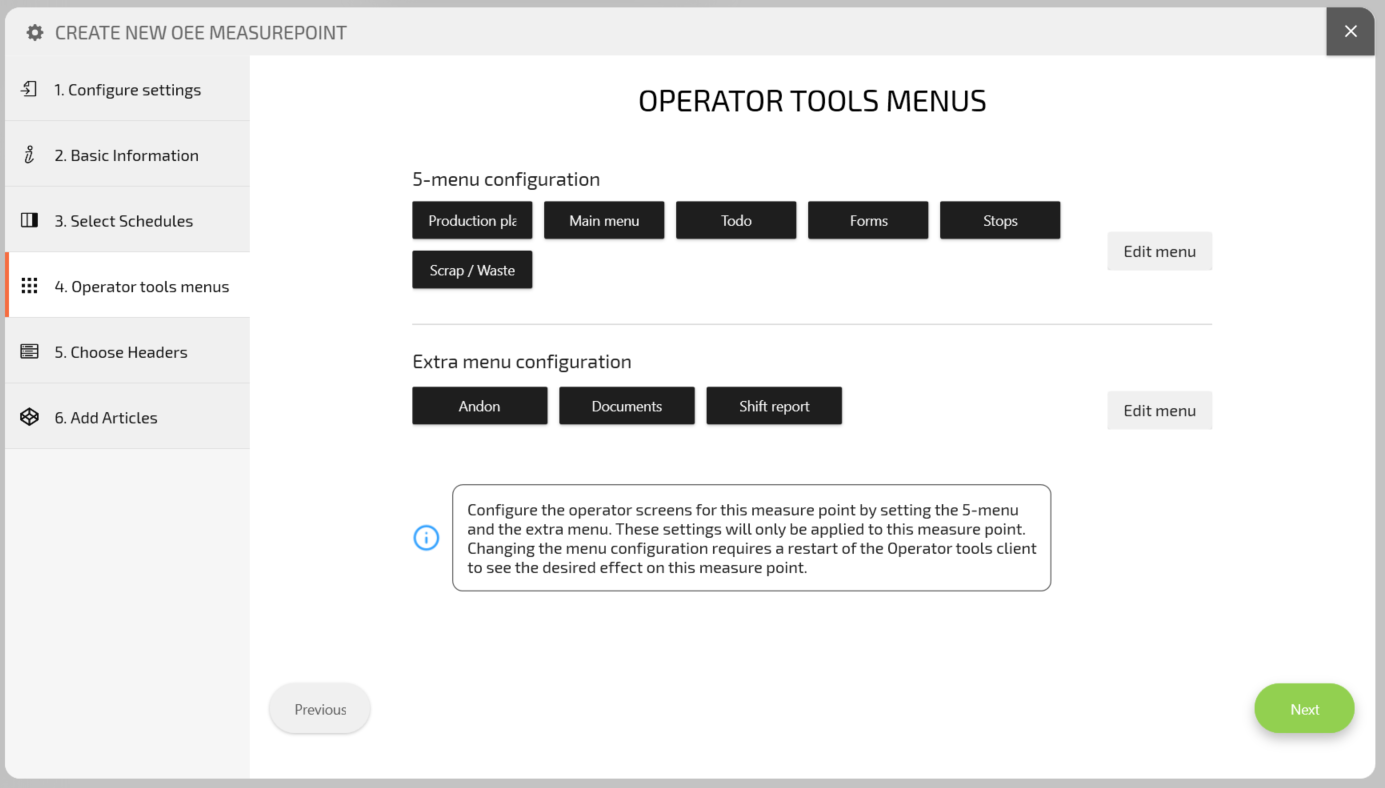
The next step is Operator Tools Menus.
The wizard includes two menu configuration areas:
- 5-menu configuration: The main menu arrangement, with options such as Production Plan, Main Menu, Todo, Forms, Stops, and Scrap/Waste.
- Extra menu configuration: Additional options such as Andon, Documents, and Shift Report.
Click Edit Menu to adjust the available configuration.
Important: Good Solutions Web Compatibility
This part of the wizard was designed for the original RS Production Operator Tools.
Operator Tools is now part of Good Solutions Web, where the navigation and available configuration options are more limited.
Consequently:
- Not all menu options shown in the wizard are relevant to Good Solutions Web.
- The legacy five-menu layout should not be treated as an exact representation of the web interface.
- Some configuration choices may only apply to the older desktop Operator Tools environment.
The wizard will eventually be replaced with a configuration experience better suited to Good Solutions Web.
For now, use this step only for the menu settings relevant to your installation.
Click Next.
Step 6: Choose Operator Tools Headers
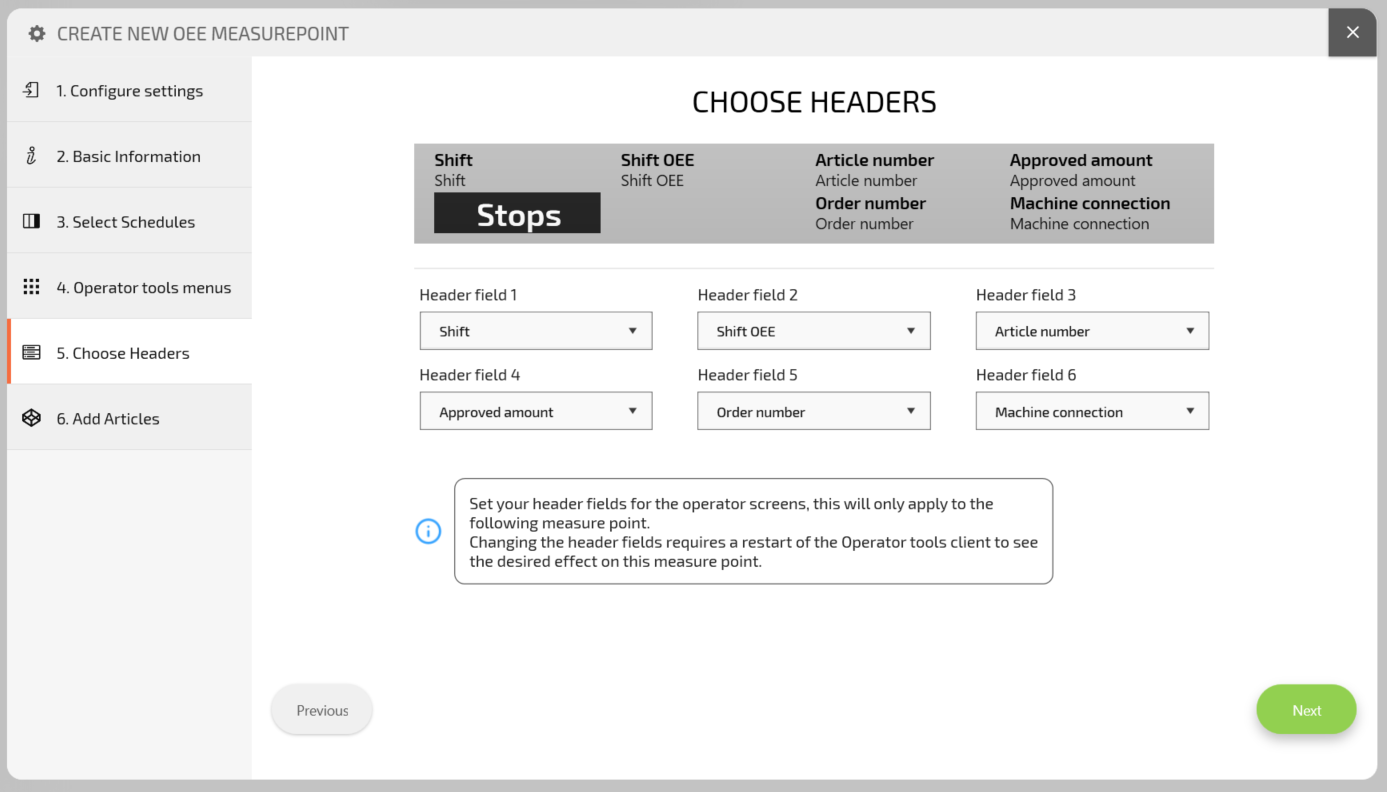
The Choose Headers step allows you to configure which information is displayed in the Operator Tools header area.
The wizard provides six configurable header fields.
Examples include:
- Shift
- Shift OEE
- Article Number
- Approved Amount
- Order Number
- Machine Connection
Use the dropdown menus to select the information you want displayed.
A preview shows how the configured headers will appear.
Choosing Useful Header Information
The most useful information depends on the production environment.
For example, an order-driven production line might prioritize Article Number, Order Number, and Approved Amount.
A production line focused on daily performance might prioritize Shift and Shift OEE.
Important: These header settings were originally designed for RS Production Operator Tools. The Good Solutions Web interface uses a different layout, so not all legacy header choices necessarily affect the web experience.
Click Next.
Step 7: Add Articles
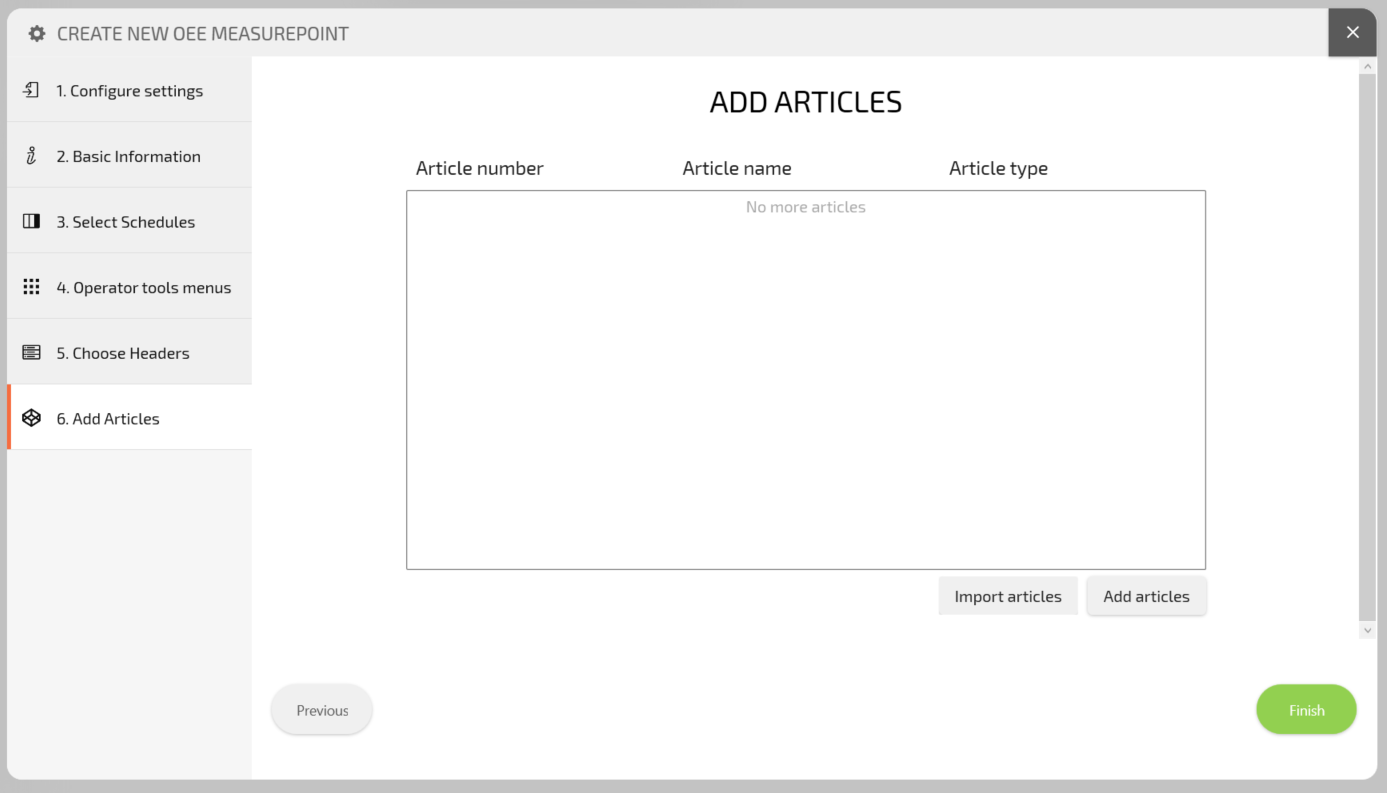
The final step is Add Articles.
Articles represent the products manufactured on the Measure Point.
The wizard displays a table containing:
- Article Number
- Article Name
- Article Type
You can use Add Articles or Import Articles to associate Articles with the Measure Point.
If Articles have already been configured elsewhere in GS Desktop, select the relevant Articles rather than creating unnecessary duplicates.
Associating Articles with the correct Measure Point helps ensure that production data is linked to the products being manufactured.
Tip: If you do not yet have the necessary Articles configured, you can manage them separately through the Articles & Orders settings.
When you have finished, click Finish.
Step 8: Verify Your New Measure Point
After completing the wizard, you return to the Measure Points settings page.
The new Measure Point should appear under its assigned Section.
If you cannot see it immediately, expand the relevant Section using the small arrow.
Review the Measure Point to confirm that:
- The name and OEE target are correct.
- The appropriate Shift Schedule is assigned.
- The correct Stop, Scrap, and Rework Reason folders are selected.
- Relevant Articles are associated.
- Any applicable Operator Tools settings are correct.
Your new Measure Point is now configured.
What Happens Next?
Creating a Measure Point establishes the configuration for a machine or production line, but it does not automatically connect the machine to Good Solutions.
To begin collecting production data, you must also configure the relevant machine signals.
Depending on the equipment, this might involve:
- Connecting an IoT device or OPC interface.
- Configuring Cycle or Counter Signals to collect production quantities.
- Configuring Production Time Signals to detect running and stopped states.
- Connecting Scrap and Rework Signals.
- Associating each signal with the correct Measure Point.
Once the machine connections are configured, verify that the production data appears correctly in Good Solutions Web.
Key Takeaways
- Measure Points represent the equipment or processes monitored in Good Solutions.
- New OEE Measure Points are created using the configuration wizard in GS Desktop.
- The wizard guides you through settings, basic information, schedules, Operator Tools configuration, headers, and Articles.
- Copying settings from an existing Measure Point can simplify configuration.
- Some Operator Tools settings are legacy options and do not fully apply to Good Solutions Web.
- Machine signal connections must be configured separately before production data can be collected automatically.