
A Form Trigger allows you to automatically make a Form available to Operators when a specific event occurs in production.
Instead of relying on Operators to remember when to complete a checklist, inspection, or other procedure, Good Solutions can automatically trigger the Form at the appropriate moment.
For example, you can use Form Triggers to:
- Perform quality inspections: Trigger a quality check when a production order starts or finishes.
- Standardize shift routines: Trigger a checklist at the beginning or end of a shift.
- Follow up on production stops: Trigger a Form when a production stop is categorized with a specific stop reason.
- Monitor production quality: Trigger inspections based on the number of products manufactured.
- Perform recurring checks: Trigger Forms at defined intervals during production.
Form Triggers help ensure that important procedures are performed consistently and at the right time, reducing manual administration and improving the quality of production data.
Step 1: Open Form Settings
- Navigate to Forms in Good Solutions Web.
- Create a new Form or open an existing Form.
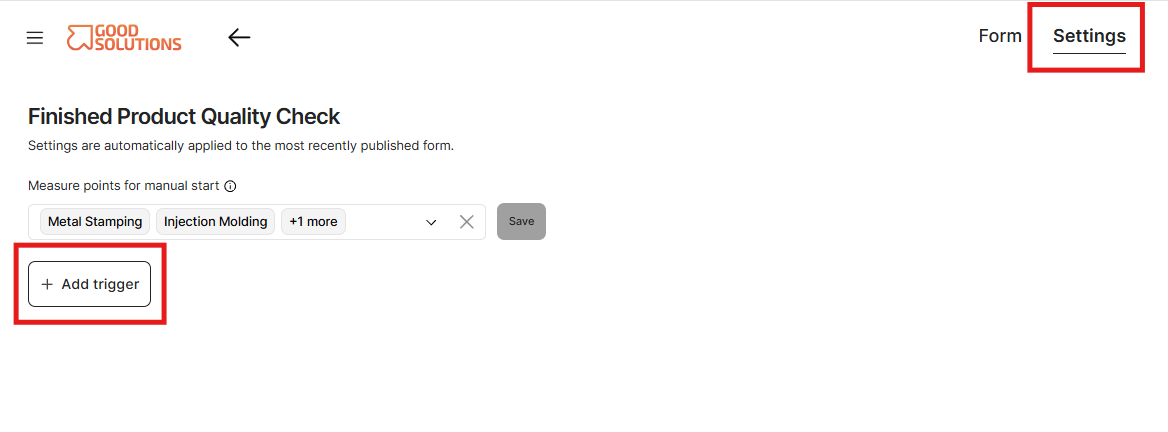
- Select the Settings tab in the Form editor.
- Locate the Triggers section.
This section allows you to create and manage the automatic triggers associated with your Form.
Important: A Form must be published before Operators can use it. You can prepare trigger settings while creating your Form, but only published Forms are available in Operator Tools.
Step 2: Create a new Trigger
- In the Triggers section, click Add Trigger.
- Select the type of production event that should activate the Form.
- Configure the settings for the selected trigger.
- Save your Trigger.
The available settings depend on which trigger type you select.
For example, a trigger based on the start of a production order will have different configuration options than a trigger based on produced quantity or a scheduled time.
You can learn more about the different trigger types and their configuration options in the article Trigger Settings.
Step 3: Configure when the Form should be triggered
Depending on the selected trigger type, you may be able to configure additional conditions that determine when the Form should become available.
These can include:
- Production event: The activity that activates the Form, such as an order starting or a stop being categorized.
- Timing: Whether the Form should be triggered at, before, or after a particular event.
- Recurring triggers: Whether the Form should be triggered repeatedly based on a defined interval or production quantity.
- Additional conditions: Specific criteria that must be met for the trigger to activate.
For example, you might configure a quality inspection to be triggered every time a defined quantity of products has been manufactured.
Tip: Consider when the Operator needs the Form, rather than simply when an event occurs. A well-timed Form is more likely to be completed correctly and without disrupting production.
Step 4: Save your Trigger
Once you have configured the trigger:
- Review the selected production event and its settings.
- Save the Trigger.
- Verify that it appears in the Form's Triggers section.
You can configure multiple triggers for the same Form if it needs to be completed at different stages of production.
For example, a quality checklist could be triggered both when a production order starts and when it finishes.
Important: Trigger settings are applied independently of the Form's published content. Adding or changing a Trigger does not require publishing a new Form version.
Step 5: How Operators receive triggered Forms
When a configured production event occurs, Good Solutions automatically makes the associated Form available in the Operator Tools action list.
Operators can then:
- Open the triggered Form from their action list.
- Complete the required questions and checks.
- Submit the completed Form.
The submitted answers are stored in Good Solutions and can be reviewed through Forms reporting.
This makes it possible to follow up on completed procedures, identify deviations, and analyse production activities.
Manual Start vs. Form Triggers
Forms can be made available through manual start, automatic triggers, or both.
| Manual Start | Form Triggers |
|---|---|
| The Operator decides when to start the Form. | Good Solutions automatically triggers the Form based on a configured event. |
| Configured through Measure Points for Manual Start. | Configured through Form Triggers. |
| Suitable for on-demand inspections and checks. | Suitable for event-driven and recurring procedures. |
For example, an Operator might manually start an additional quality inspection after noticing a potential issue, while Good Solutions automatically triggers the same Form at the beginning of each production order.
Tips for creating effective Form Triggers- Choose relevant events: Connect Forms to production events where the information is most valuable.
- Consider the Operator's workflow: Trigger Forms when Operators can realistically complete them.
- Avoid unnecessary triggers: Too many triggered Forms can create additional work for Operators.
- Use standardized Forms: Reuse Forms across different production events when the same procedure applies.
- Review trigger configurations: Make sure triggers remain relevant as production processes change.
What's next?
Now that you know how to create a Form Trigger, read Trigger Settings to learn about the different trigger types available in Good Solutions and how to configure their timing, conditions, and recurring behaviour.