
Understanding Shift Scheduling
Shift Schedules define when your production equipment is expected to operate.
Good Solutions uses this information to distinguish between planned production time and time when production is not scheduled.
This is essential for calculating Availability and OEE correctly.
Shift scheduling in GS Desktop is organized around three main concepts:
| Concept | Description |
|---|---|
| Shifts | Define the different working shifts used in your factory, such as Day, Evening, Night, or Weekend. |
| Shift Schedule Templates | Define reusable scheduling patterns, including which Shifts occur and when. |
| Shift Schedules | Define the actual planned production periods for individual Measure Points. |
The recommended configuration order is:
- Create your Shifts.
- Create Shift Schedule Templates.
- Assign Shift Schedules to your Measure Points.
- Review and maintain your Shift Schedules.
1. Set Up Shifts
Shifts represent the different working periods used in your production environment.
For example, a factory operating around the clock might use Day, Evening, and Night Shifts.
Each Shift can be assigned a name and color, making it easier to distinguish between Shifts in scheduling views and production analysis.
How to Create a Shift
- Open GS Desktop.
- Navigate to Settings → Scheduling.
- Under Shift schedule templates, locate Shifts.
- Click Create.
- Enter a descriptive Name.
- Select a Color to identify the Shift.
- Configure Is Dynamic, if applicable.
- Click Save.
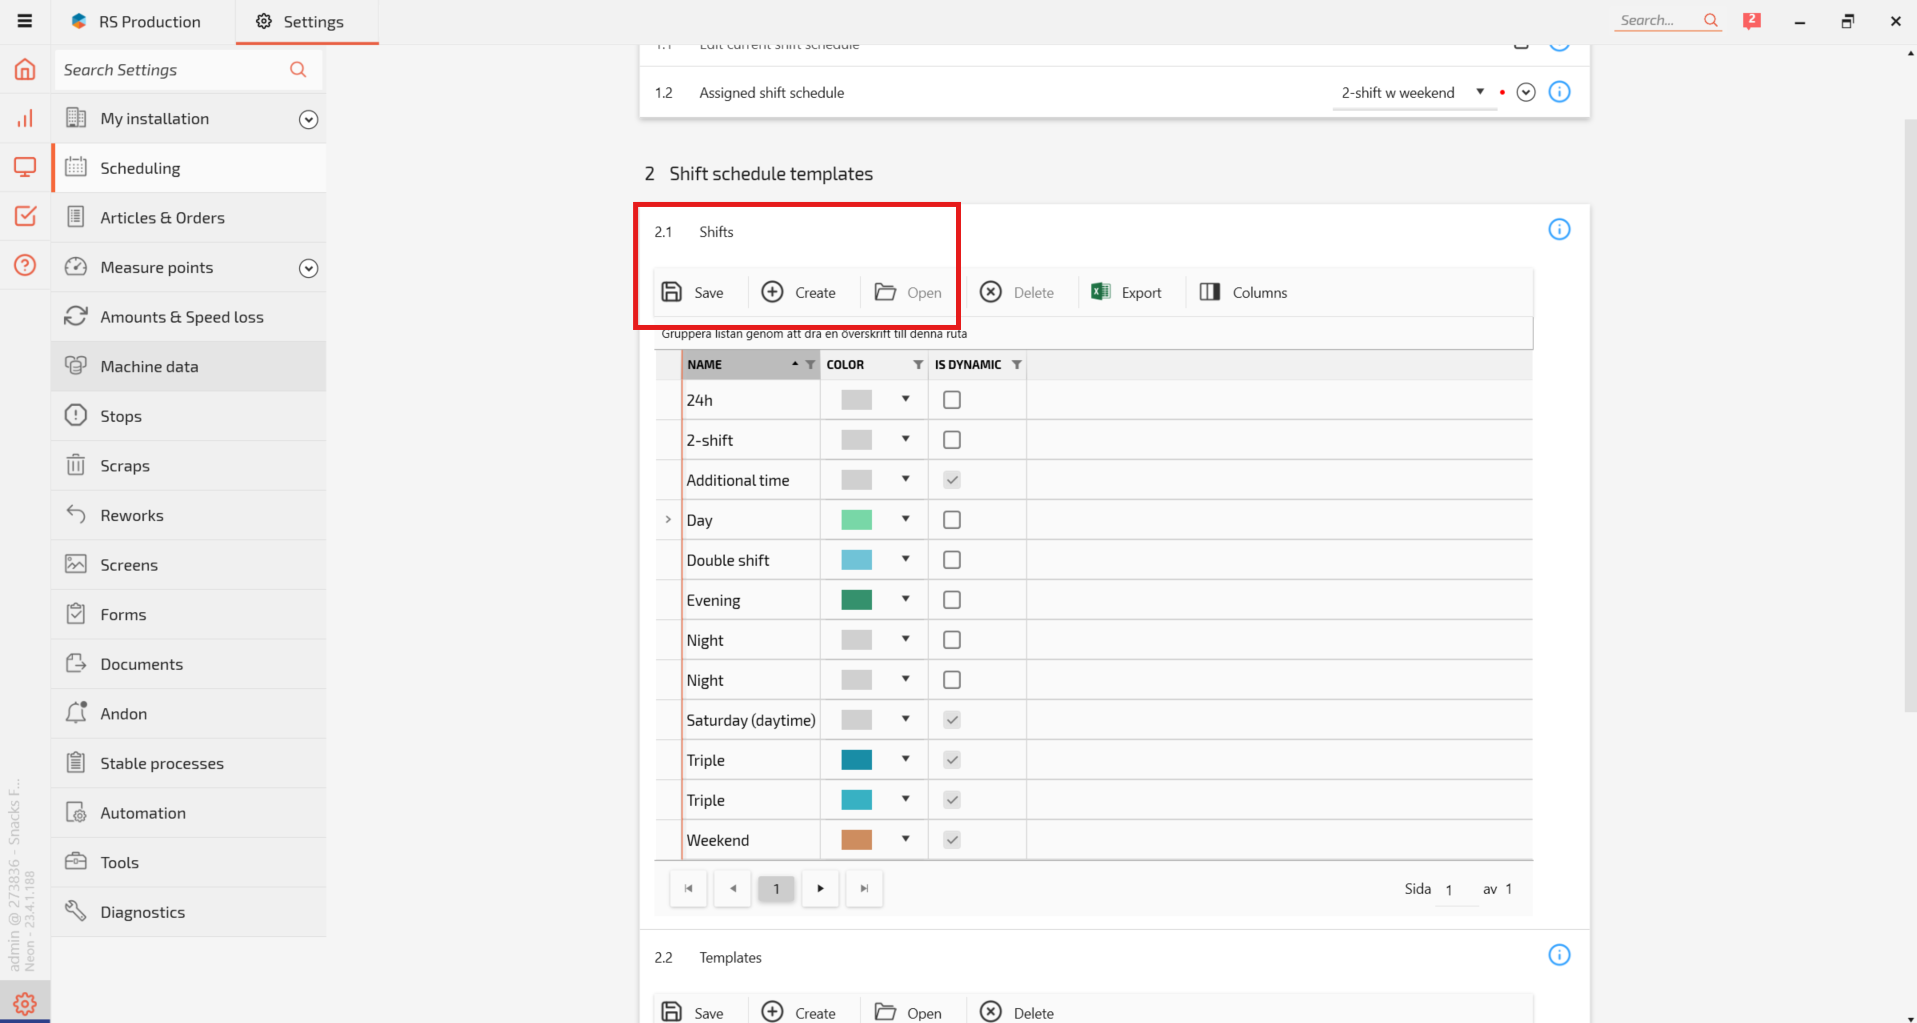
Shift Settings
| Setting | Description |
|---|---|
| Name | Identifies the Shift, such as Day, Evening, or Night. |
| Color | Determines the color used to represent the Shift in scheduling views. |
| Is Dynamic | Identifies whether the Shift uses dynamic scheduling behavior. |
Example
A factory operating three Shifts might configure:
| Shift | Example Time |
|---|---|
| Day | 06:00–14:00 |
| Evening | 14:00–22:00 |
| Night | 22:00–06:00 |
These times are examples. The actual working hours are configured in the Shift Schedule Template.
Tip: Use consistent Shift names and colors throughout your installation to simplify scheduling and reporting.
2. Create Shift Schedule Templates
Shift Schedule Templates define recurring patterns of Shifts.
Instead of manually scheduling every Shift, you can create a Template that represents a typical working pattern and reuse it when planning production.
For example:
- Two-shift production.
- Three-shift production.
- Weekend production.
- Continuous production.
How to Create a Shift Schedule Template
- In GS Desktop, navigate to Settings → Scheduling.
- Under Shift schedule templates, open Templates.
- Click Create.
- Enter a descriptive Name.
- Select a Color.
- Set the Duration, defining the length of the repeating pattern in days.
- Select Start on Weekday to define when the Template begins.
- Click Save.
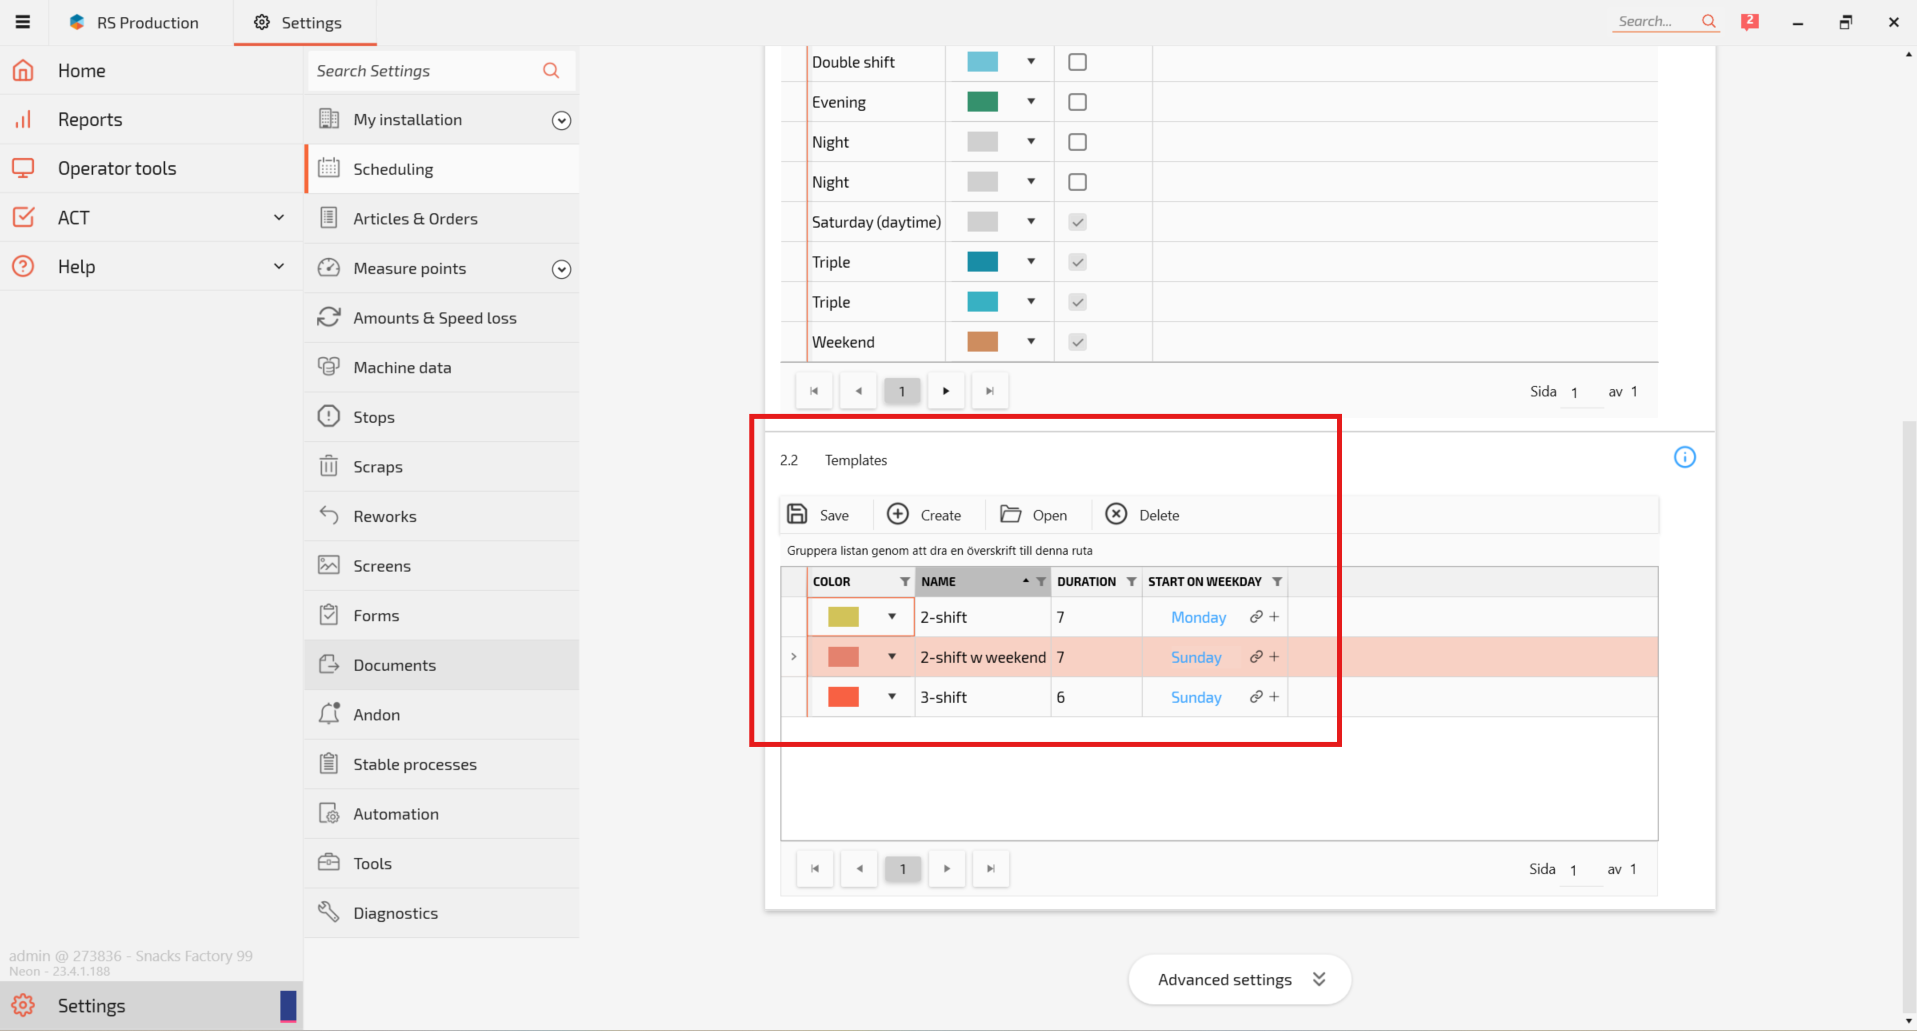
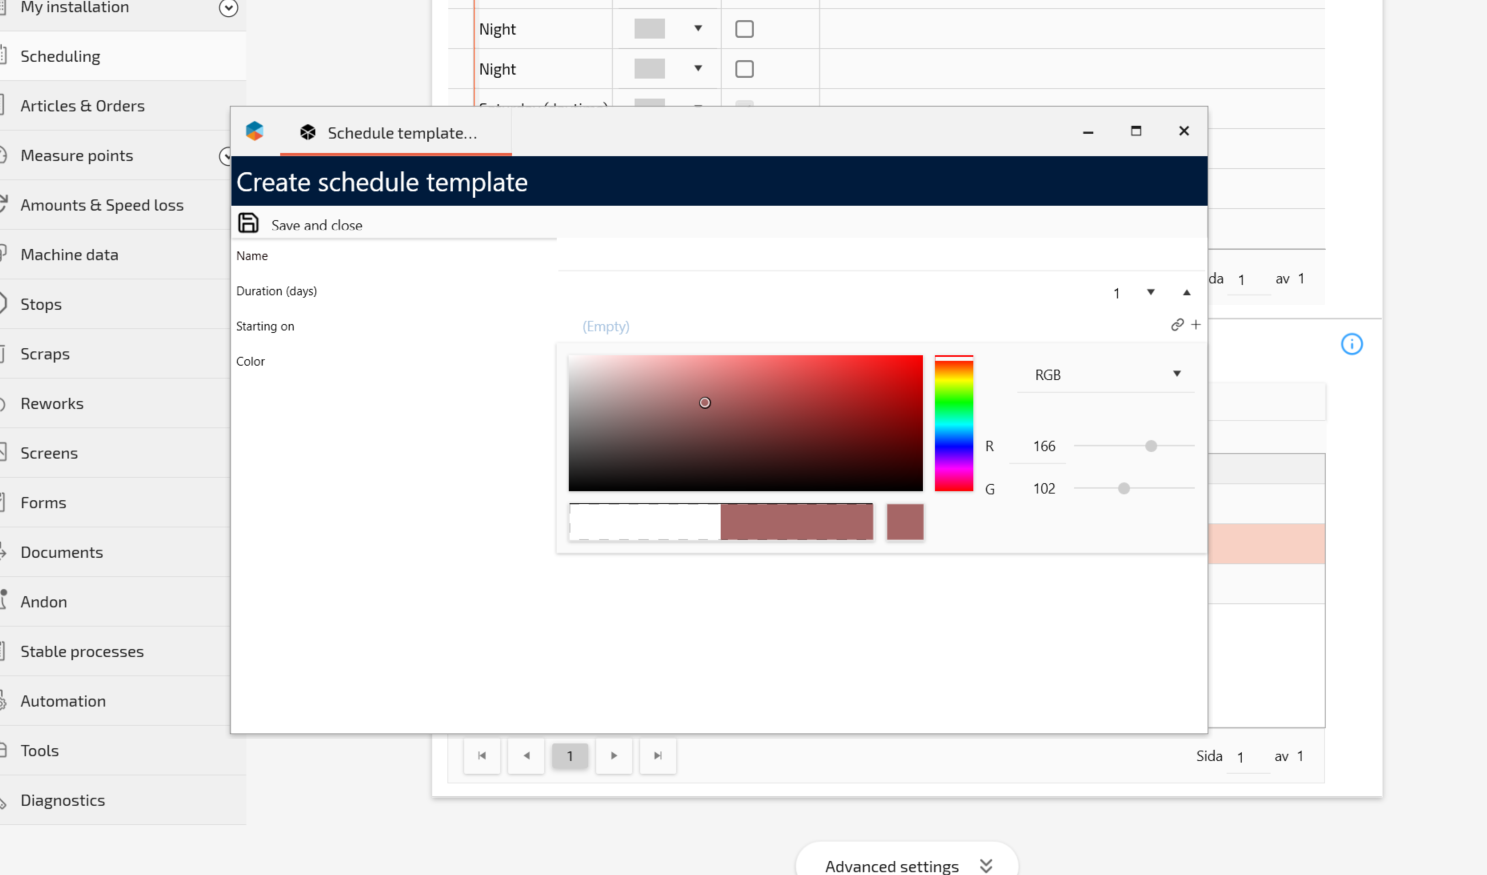
Template Settings
| Setting | Description |
|---|---|
| Name | Identifies the Template, such as 2-shift or 3-shift. |
| Color | Provides visual identification of the Template. |
| Duration | Defines the number of days in the repeating schedule pattern. |
| Start on Weekday | Defines which weekday the Template begins on. |
Add Shifts to the Template
After creating the Template, define the Shifts that should occur within its repeating pattern.
- Select the Template and click Open.
- Locate the scheduling timeline.
- Right-click the timeline where you want to add a Shift.
- Select Create new → Shift.
- Enter the Start and End times.
- Select the appropriate Shift.
- Select the relevant weekday.
- Save the Shift.
- Repeat for the remaining Shifts.
- Save the Template.
Example: Two-Shift Template
A factory operating two Shifts Monday through Friday could create the following pattern:
| Day | Shift | Time |
|---|---|---|
| Monday–Friday | Day | 06:00–14:00 |
| Monday–Friday | Evening | 14:00–22:00 |
| Saturday–Sunday | No scheduled production | — |
Configure the Template with a duration of seven days, starting on Monday.
Tip: Create Templates that reflect your most common production patterns. This reduces repetitive administration and helps maintain consistent schedules.
3. Assign a Shift Schedule
Once your Shift Schedule Templates have been configured, you can assign a Shift Schedule to your production equipment.
The Shift Schedule determines when a particular Measure Point is expected to operate.
Assign a Standard Shift Schedule
- Navigate to Settings → Scheduling.
- Under Current shift schedule, locate Assigned shift schedule.
- Select the appropriate Shift Schedule Template from the dropdown menu.
- Save the configuration.
This establishes the assigned Shift Schedule.
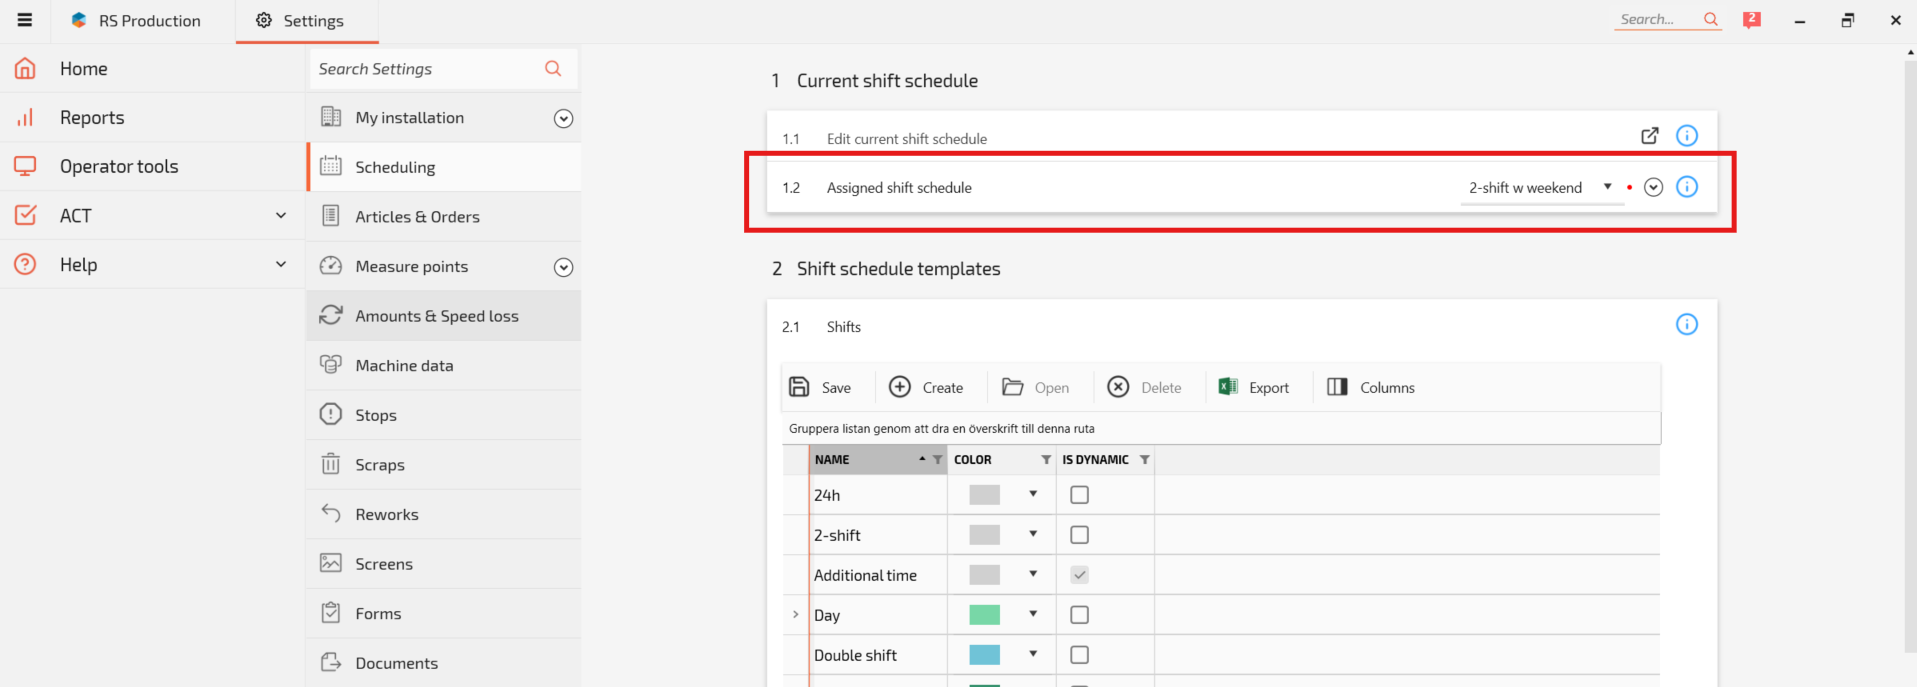
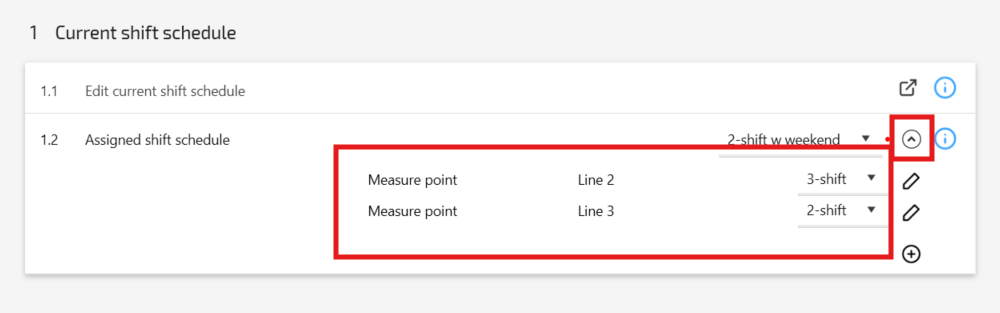
Configure Shift Schedules for Individual Measure Points
Different Measure Points may require different production schedules.
For example:
| Measure Point | Shift Schedule |
|---|---|
| Assembly Line 01 | Two-shift |
| Assembly Line 02 | Three-shift |
| Packaging Line 01 | Day shift only |
To configure individual schedules, open Edit current shift schedule and select the relevant Measure Point.
You can then review and adjust its planned production periods.
4. Edit the Current Shift Schedule
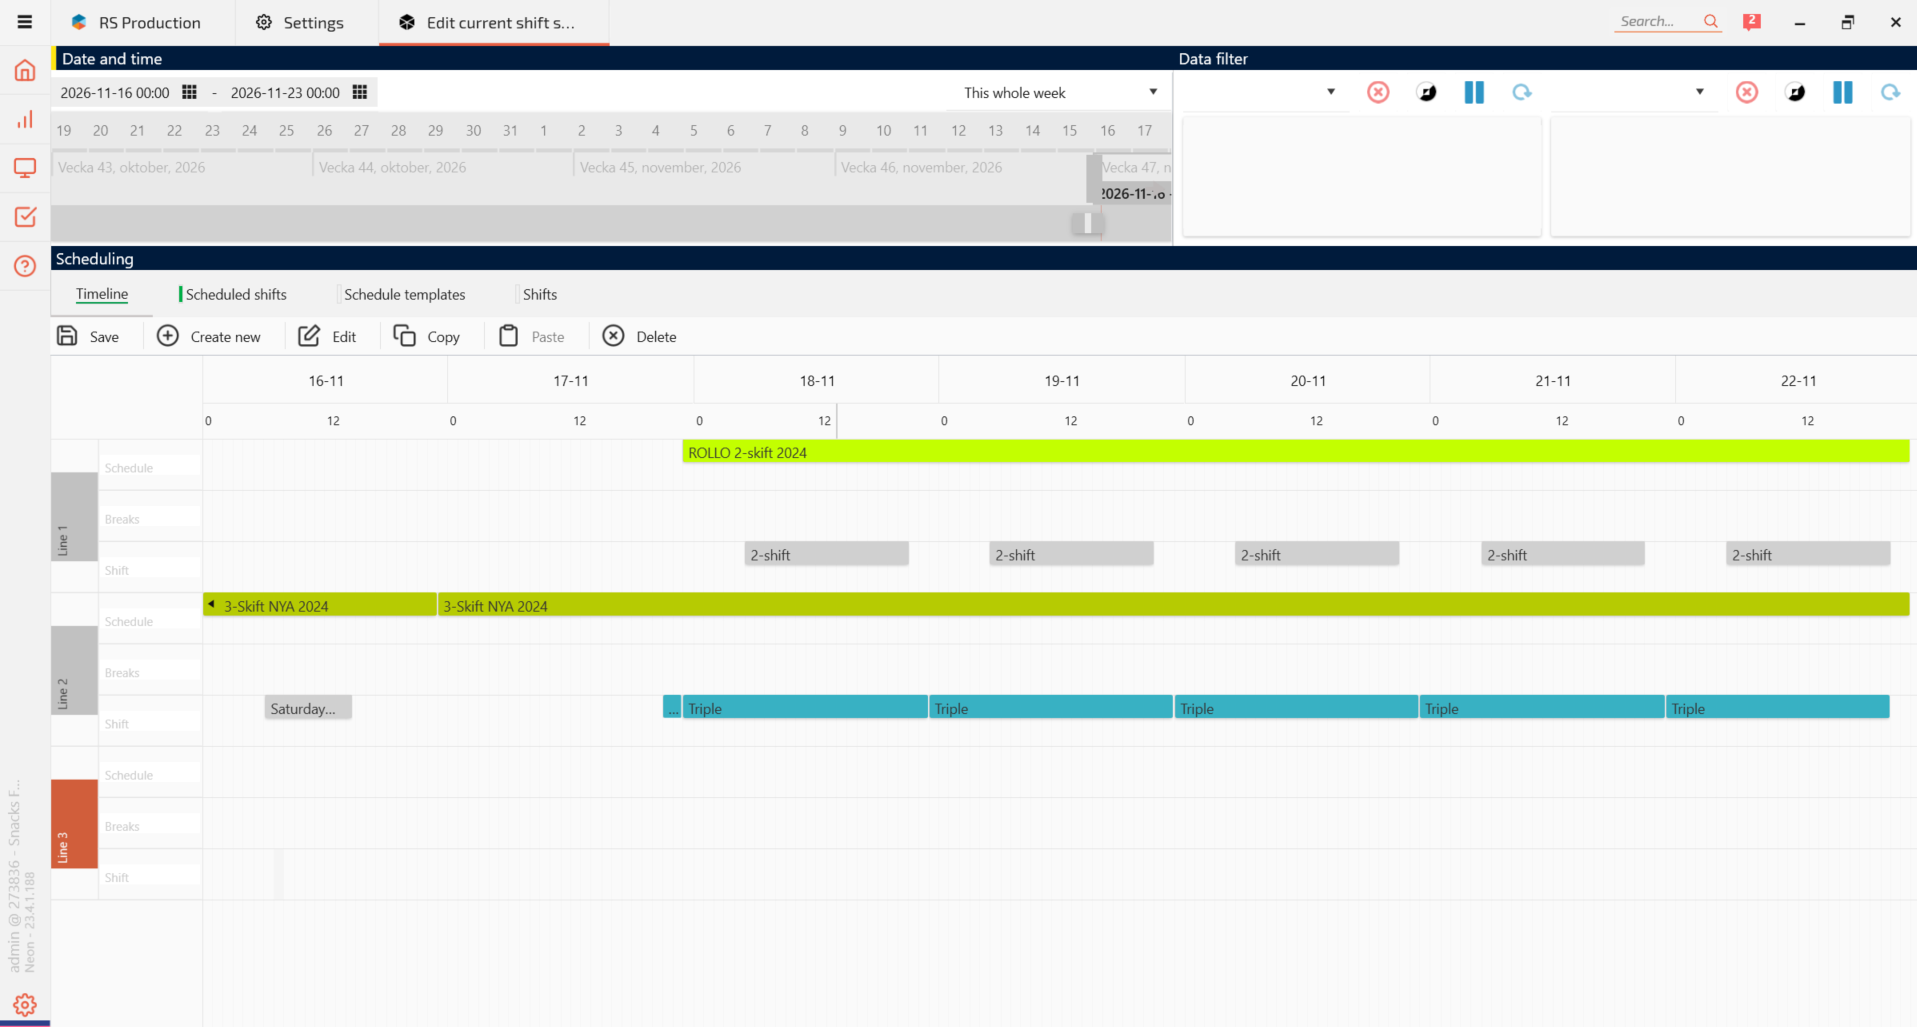
The Edit current shift schedule function provides a visual timeline where you can review and manage the actual production schedule.
Open the Shift Schedule Editor
- In GS Desktop, navigate to Settings → Scheduling.
- Under Current shift schedule, select Edit current shift schedule.
- The Shift Schedule Editor opens.
- Select the time period you want to review.
The editor displays a timeline with the configured Shift Schedules for your production equipment.
Understanding the Shift Schedule Timeline
The timeline displays the schedule for each Measure Point.
Each Measure Point has separate rows for:
| Row | Description |
|---|---|
| Schedule | Shows the assigned Shift Schedule and its active period. |
| Breaks | Shows configured breaks within the schedule. |
| Shift | Shows the individual scheduled Shifts. |
The timeline uses colors to distinguish between different Shift Schedules and Shifts.
For example, a production line might display a green Schedule bar and grey Shift bars, while another production line uses a different color scheme.
Available Timeline Functions
The Shift Schedule Editor includes several functions:
- Save: Save scheduling changes.
- Create new: Create a new scheduling item.
- Edit: Modify an existing item.
- Copy: Copy a selected scheduling item.
- Paste: Paste a copied item.
- Delete: Remove a selected item.
You can also navigate between time periods to review historical and upcoming Shift Schedules.
5. Create or Adjust a Shift Schedule in the Timeline
When production requirements change, you may need to create or modify a Shift Schedule.
Example: Adding a New Shift Schedule
- Open Edit current shift schedule.
- Navigate to the relevant date.
- Select the Measure Point you want to configure.
- Click Create new, or right-click the timeline.
- Select the appropriate scheduling item.
- Configure the start date and required Shift Schedule Template.
- Review the resulting schedule.
- Click Save.
Example: Temporary Schedule Changes
Suppose a production line normally operates two Shifts, but additional production is required on Saturday.
You can update the Shift Schedule to reflect the additional working period.
This ensures that Good Solutions includes the additional planned production time when evaluating production performance.
Important: Always review the resulting timeline after changing a Shift Schedule to ensure the planned working periods are correct.
6. Configure Breaks and Excluded Time
Not all time within a Shift is necessarily intended for production.
For example, a Shift may include scheduled breaks when the equipment is not expected to operate.
The Shift Schedule Editor includes a separate Breaks row where these periods can be displayed.
Example
A Shift runs from 06:00 to 14:00.
| Time | Duration |
|---|---|
| Total Shift Duration | 8 hours |
| Scheduled Breaks | 30 minutes |
| Planned Production Time | 7 hours 30 minutes |
When breaks are configured as excluded time, they do not count toward Planned Production Time.
This prevents expected breaks from incorrectly reducing Availability.
Tip: Verify that scheduled breaks are correctly configured for each Measure Point, particularly when different production lines follow different break patterns.
7. How Shift Scheduling Affects OEE
Shift Scheduling is fundamental to accurate OEE calculations.
OEE consists of three components:
OEE = Availability × Performance × Quality
The Shift Schedule determines when equipment is expected to produce and therefore helps establish the planned production time used in the Availability calculation.
Example
A production line has:
- Planned Production Time: 450 minutes
- Production Time: 405 minutes
- Availability Loss: 45 minutes
Availability is calculated as:
Availability = 405 / 450 = 90%
If the Shift Schedule incorrectly includes time when production was never intended, Availability may appear lower than it should.
Similarly, if scheduled production time is missing, the system may not account for all relevant production losses.
Correct Shift Scheduling is therefore essential for reliable production analysis.
8. Using Shift Information in Good Solutions Web
Once Shift Schedules have been configured in GS Desktop, the information becomes useful throughout Good Solutions Web.
Dashboards
Dashboards can display production performance for selected periods and Measure Points, making it possible to follow performance during current or previous Shifts.
Reports
Production reports can help you compare performance across Shifts and identify recurring patterns.
For example:
- Which Shift has the highest OEE?
- Are production stops more frequent during Night Shifts?
- Does production output differ between Shifts?
Timeline
The Timeline provides a visual overview of production activities over time.
By comparing production events with scheduled working periods, users can better understand when losses occurred.
Operator Tools
Operators can use the Shift Report to review production performance and navigate between Shifts.
This supports Shift handovers and daily production follow-up.
Best Practices
- Use consistent Shift names. Make working periods easy to recognize.
- Assign meaningful colors. Use colors consistently across the installation.
- Create reusable Templates. Avoid unnecessary duplication of scheduling configurations.
- Keep Shift Schedules accurate. Update them when production plans change.
- Configure breaks correctly. Ensure planned breaks are excluded where appropriate.
- Review schedules regularly. Incorrect schedules can lead to misleading Availability and OEE calculations.
- Use the timeline to verify changes. Visually confirm that the correct Shifts are scheduled for each Measure Point.
Key Takeaways
- Shifts define the different working periods in your factory.
- Shift Schedule Templates define reusable patterns of Shifts.
- Shift Schedules determine when production is expected at each Measure Point.
- The Edit current shift schedule function provides a visual timeline for managing schedules, Shifts, and breaks.
- Accurate Shift Schedules are essential for correct Availability and OEE calculations.
- Shift information supports production analysis in Dashboards, Reports, Timeline, and Operator Tools.